In my previous blog post I documented how to take a Java Spring Boot application and convert it into a serverless function, which can be run in the likes of AWS Lambda.
Anyone who’s done this before knows that cold starts are a big downside – Java and Spring Boot are not known for their speedy startup times, and a typical full fat Spring Boot converted lambda can take anything from 10 to 90 seconds depending on how much memory and cpu you allocate it. This may lead you over-provision them to compensate for the cold starts, but that’s a pretty expensive sledge hammer.
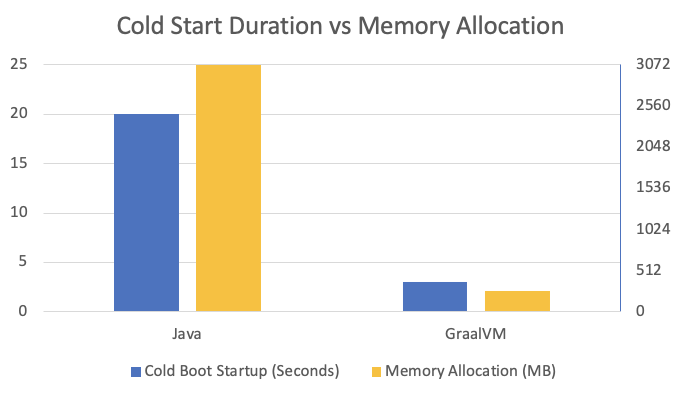
But what if I told you the same function could start from a cold boot in ~ 3 seconds? Compared with other languages it’s still a little sluggish, but given the comparable start up times of Sprint Boot jars in containers or Lambda, it’s pretty groundbreaking. And it’s possible because of GraalVM.
GraalVM has been gaining a lot of traction over the past couple of years – it allows us to build platform-specific binaries that can be run directly without the need for a JVM, and with this we can speed up the cold start time of our functions. It’s still in its infancy, but at a point now where there’s a strong community and a lot of the common issues you face can be solved with a bit of Google-fu.
In this article I’m going to show you how you can take a real world REST application example (Spring Petclinic) adapted to spring-cloud-function, and significantly speed up the cold start time using GraalVM, whilst reducing the memory/cpu footprint.
I’ll be working through my GitHub example I’ve put together, feel free to follow along and borrow for your own purposes
https://github.com/foyst/spring-petclinic-rest-serverless/tree/2-spring-cloud-native
Disclaimer – at the time of writing GraalVM is still in beta, and you may face other issues alongside the ones documented here. Discretion and consideration is advised if adopting this approach for production workloads.
References
I came across the following documentation as part of my exploration which I found really useful. I’ll leave these here in case they help others on a similar journey:
https://docs.spring.io/spring-native/docs/current/reference/htmlsingle/#overview
https://github.com/graalvm/graalvm-demos/tree/master/native-image-configure-examples
https://www.kabisa.nl/tech/beat-java-cold-starts-in-aws-lambdas-with-graalvm/
https://codetinkering.com/spring-native-example/
https://www.graalvm.org/reference-manual/native-image/ClassInitialization/
https://www.graalvm.org/reference-manual/native-image/Reflection/
https://www.graalvm.org/reference-manual/native-image/Options/
https://blog.frankel.ch/configuring-graal-native-aot-reflection/
Moving to GraalVM
To start with I followed the Spring guide on how to get started with GraalVM https://docs.spring.io/spring-native/docs/current/reference/htmlsingle/
The trick is to optimise for build time as much as possible. The more you can push to build time initialisation the better. By default Spring Native will initialise all classes at runtime (which doesn’t provide much benefit over the usual JVM with JIT combo), but you can explicitly declare classes that should be initialised at build time. There’s a good article here that talks about this default behaviour, and how to determine which classes are candidates for build time initialisation. Spring Native simplifies this significantly, as it’s already aware of all the Spring framework classes that are suitable to initialise at boot time, and configures the native-image build accordingly.
GraalVM is fairly compatible with Spring and Spring Boot, however there is a known list of issues between the two which whilst will hopefully get fixed over time are worth being aware of now as they’re likely to trip you up. I’ve captured a list of issues I encountered along the way – there are some ways around these issues but they may not work for every application.
There are a few dependencies and plugins to add to the pom.xml that enable the use of GraalVM. This is based off my previous post which shows how to port a Spring Boot application to Lambda so I’ll not include those details here. You can see my full pom here but specifically it’s a case of adding the below to the lambda profile:
            <properties>
                ...
                <repackage.classifier>exec</repackage.classifier>
            </properties>
             ...
             <dependency>
                    <groupId>org.springframework.experimental</groupId>
                    <artifactId>spring-native</artifactId>
                    <version>0.10.3</version>
                </dependency>
            </dependencies>
            ...
            <plugin>
                        <groupId>org.springframework.experimental</groupId>
                        <artifactId>spring-aot-maven-plugin</artifactId>
                        <version>0.10.3</version>
                        <executions>
                            <execution>
                                <id>test-generate</id>
                                <goals>
                                    <goal>test-generate</goal>
                                </goals>
                            </execution>
                            <execution>
                                <id>generate</id>
                                <goals>
                                    <goal>generate</goal>
                                </goals>
                            </execution>
                        </executions>
                    </plugin>
                    <plugin>
                        <groupId>org.hibernate.orm.tooling</groupId>
                        <artifactId>hibernate-enhance-maven-plugin</artifactId>
                        <version>5.4.30.Final</version>
                        <executions>
                            <execution>
                                <configuration>
                                    <failOnError>true</failOnError>
                                    <enableLazyInitialization>true</enableLazyInitialization>
                                    <enableDirtyTracking>true</enableDirtyTracking>
                                    <enableAssociationManagement>true</enableAssociationManagement>
                                    <enableExtendedEnhancement>false</enableExtendedEnhancement>
                                </configuration>
                                <goals>
                                    <goal>enhance</goal>
                                </goals>
                            </execution>
                        </executions>
                    </plugin>
                    <plugin>
                        <groupId>org.apache.maven.plugins</groupId>
                        <artifactId>maven-deploy-plugin</artifactId>
                        <configuration>
                            <skip>true</skip>
                        </configuration>
                    </plugin>
                    <plugin>
                        <groupId>org.springframework.boot</groupId>
                        <artifactId>spring-boot-maven-plugin</artifactId>
                        <configuration>
                            <classifier>${repackage.classifier}</classifier>
                        </configuration>
                    </plugin>
                    <plugin>
                        <groupId>org.graalvm.buildtools</groupId>
                        <artifactId>native-maven-plugin</artifactId>
                        <version>0.9.4</version>
                        <executions>
                            <execution>
                                <goals>
                                    <goal>build</goal>
                                </goals>
                                <phase>package</phase>
                            </execution>
                            <execution>
                                <id>test</id>
                                <goals>
                                    <goal>test</goal>
                                </goals>
                                <phase>test</phase>
                            </execution>
                        </executions>
                        <configuration>
                            <buildArgs>
                                --enable-url-protocols=http
                                -H:+AddAllCharsets
                            </buildArgs>
                        </configuration>
                    </plugin>
                    <plugin>
                        <artifactId>maven-assembly-plugin</artifactId>
                        <executions>
                            <execution>
                                <id>native-zip</id>
                                <phase>package</phase>
                                <goals>
                                    <goal>single</goal>
                                </goals>
                                <inherited>false</inherited>
                            </execution>
                        </executions>
                        <configuration>
                            <descriptors>
                                <descriptor>src/assembly/native.xml</descriptor>
                            </descriptors>
                        </configuration>
                    </plugin>
There’s a few points worth mentioning about the above configuration:
hibernate-enhance-maven-plugin– this allows Hibernate to optimise a lot of what it does at build time, to reduce the start up time. Doesn’t have to be used in conjunction with Lambda or GraalVM – you can use this on standard applications toospring-boot-maven-plugin– the classifier property stops Spring Boot from overwriting the jar used by thenative-imagetool with the Spring Boot uberjar, which isn’t compatiblenative-maven-plugin– this is where all the magic happens which I’ll go into more detail on later. Important part of this is in the<configuration>, which allows you to control various aspects of the native image build process.maven-assembly-plugin– this is used to take the binary which we’ll create, and wrap it in a zip archive along with a bootstrap script used by AWS Lambda
This is most of the configuration you need to take your spring-cloud-function (or standard Spring Boot application for that matter) and generate a native binary from it. The next step is to run a Maven package command to kick this off. If you’re like me you’ll want to run the build process in a Docker container that already has Java and GraalVM preconfigured. This is the image and command I used to mount my application code and .m2 directory into a container:
docker run -v $(pwd):/petclinic -v ~/.m2:/root/.m2 -it --name petclinic-graalvm ghcr.io/graalvm/graalvm-ce:latest bashWhen in this container, you can then run the following to trigger a build (skipTests is purely here from a speed-perspective, not recommended for your application!):
./mvnw clean package -D skipTests -P lambdaThe first issue (many more documented at the end) I encountered is that Devtools isn’t supported yet:

If you use Devtools then you either need to remove it, or move it into a separate profile that you conditionally disable when building your binaries, should look like something similar to this:
<!--    <dependency>-->
<!--      <groupId>org.springframework.boot</groupId>-->
<!--      <artifactId>spring-boot-devtools</artifactId>-->
<!--      <optional>true</optional>-->
<!--    </dependency>-->
With another run of the above Maven command and a cuppa, the build completes successfully:
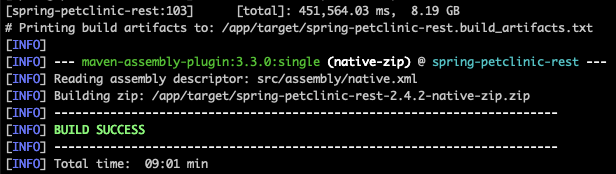
So at this point we have a compiled binary, so far so good! The tradeoff for having an optimised binary is longer build times, however I think this is acceptable given the fast cold boot times it offers (plus there’s ways to speed this process up, such as building the binaries on powerful transient build agents.
At this point though we have a binary, with no way to run it in AWS Lambda. It’s not a jar file so we can’t just upload it and tell Lambda to execute it in a Java runtime anymore.
Using a Custom Runtime
Next up what I needed to know was understand how I could get a GraalVM native image running in AWS Lambda. I knew there was the ability to build Custom Runtimes in AWS Lambda but I’d never experimented with this before, so this was new territory for me.
I became curious around how AWS Lambda takes a jar and a handler class and bootstraps that into a JVM. I figured I’d need to understand this to learn how to build an equivalent custom runtime for our native binary.
Turns out AWS Lambda treats your jar file as a zip. not a jar. So metadata like the Jar Manifest and Main-Class configuration are irrelevant. This article gives a good insight into what happens under the hood and also how to build your artefacts directly as zip files if you like https://www.oreilly.com/library/view/programming-aws-lambda/9781492041047/ch04.html. But TL;DR: Lambda adds the exploded jar contents (including your handler class) as a custom classpath, as opposed to running your jar directly (with something like java -jar myjar.jar.
Effectively, AWS Lambda runs your handler by including that class and all other classes in your bundled zip into a classpath, and then executing its own Lambda Java runtime which handles the passing of requests and responses to and from your handler class. If you’re using the latest version of spring-cloud-function (3.2.0-M1 at the time of writing), you can see that the FunctionInvoker class that’s configured as the handler initialises your Spring Boot Application context as part of its constructor.
So great, but how can I write a custom runtime that can interop between Lambda and my binary? Well by reading more into the Custom Runtimes I learnt that the Lambda API is RESTful, and it’s up to the runtime to interact with this API. Furthermore, this endpoint is provided to all runtimes via a AWS_LAMBDA_RUNTIME_API environment variable. I started thinking about how I could write a bash script that polls this endpoint and invokes my binary, passing in the event payload, but that felt very cumbersome and meant the app would have to respawn with each request which felt wrong.
After a bit of head scratching it finally dawned on me… I wonder if the spring-cloud-function team have already come up with this? Course they have it turns out, and with a quick code search in my code for AWS_LAMBDA_RUNTIME_API I found the CustomRuntimeEventLoop and CustomRuntimeInitializer classes, perfect!
There’s an example of how to run spring cloud function with GraalVM already:
https://github.com/spring-projects-experimental/spring-native/tree/main/samples/cloud-function-aws
Make sure you set the following in order to trigger spring-cloud-function to run the CustomRuntimeEventLoop (taken from https://github.com/spring-projects-experimental/spring-native/blob/main/samples/cloud-function-aws/src/main/resources/application.properties)
spring.cloud.function.web.export.enabled=true
spring.cloud.function.web.export.debug=true
spring.main.web-application-type=none
debug=true
Actually when debugging I noticed you shouldn’t enable spring.cloud.function.web.export.enabled, as this causes the CustomRuntimeInitializer to prevent spinning up the CustomRuntimeEventLoop.
AWS Lambda allows you to provide a custom runtime that runs on Amazon Linux by providing a bootstrap shell script. You can use this to bootstrap applications written in many languages. But for us all we need to do in it is execute our binary:
#!/bin/sh

cd ${LAMBDA_TASK_ROOT:-.}

./spring-petclinic-rest
Finally, we just need to bundle this bootstrap script and the binary into a zip file that we can upload to AWS Lambda. That’s what the maven-assembly-plugin does, using the following config in /src/assembly/native.xml
<assembly xmlns="http://maven.apache.org/plugins/maven-assembly-plugin/assembly/1.1.2"
          xmlns:xsi="http://www.w3.org/2001/XMLSchema-instance"
          xsi:schemaLocation="http://maven.apache.org/plugins/maven-assembly-plugin/assembly/1.1.2 https://maven.apache.org/xsd/assembly-1.1.2.xsd">
    <id>native-zip</id>
    <formats>
        <format>zip</format>
    </formats>
    <baseDirectory></baseDirectory>
    <fileSets>
        <fileSet>
            <directory>src/shell</directory>
            <outputDirectory>/</outputDirectory>
            <useDefaultExcludes>true</useDefaultExcludes>
            <fileMode>0775</fileMode>
            <includes>
                <include>bootstrap</include>
            </includes>
        </fileSet>
        <fileSet>
            <directory>target</directory>
            <outputDirectory>/</outputDirectory>
            <useDefaultExcludes>true</useDefaultExcludes>
            <fileMode>0775</fileMode>
            <includes>
                <include>spring-petclinic-rest</include>
            </includes>
        </fileSet>
    </fileSets>
</assembly>
At this point, we have a bundled zip that includes everything we need in order to run the GraalVM binary in a Custom Runtime on AWS, huzzah!
Configuring in CDK
In my CDK code I have a lambda stack which contains all of the code necessary to build and deploy the GraalVM lambdas
The graalvm-ce:latest docker image I used earlier to build the binary can also be used within the CDK process. The main difference is when used in the CDK framework our code is mounted in /asset-input and we have to place our final .zip file in the /asset-output folder so CDK can extract it and upload it to AWS Lambda:
const bundlingOptions = {
            bundling: {
                image: DockerImage.fromRegistry("ghcr.io/graalvm/graalvm-ce:21.2.0"),
                command: [
                    "/bin/sh",
                    "-c",
                    ["cd /asset-input/ ",
                        "./mvnw clean package -P lambda -D skipTests ",
                        "cp /asset-input/target/spring-petclinic-rest-2.4.2-native-zip.zip /asset-output/"].join(" && ")
                ],
                outputType: BundlingOutput.ARCHIVED,
                user: 'root',
                volumes: [{hostPath: `${homedir()}/.m2`, containerPath: '/root/.m2/'}]
            }
        };
To run a GraalVM lambda function, it has to run in an Amazon Linux 2 runtime. I’ve extracted the base configuration for a function into the below, so I can reuse it across my 2 example lambdas:
        const baseProps = {
            vpc: props?.vpc,
            runtime: Runtime.PROVIDED_AL2,
            code: Code.fromAsset(path.join(__dirname, '../../'), bundlingOptions),
            handler: 'duff.Class',
            vpcSubnets: {
                subnetType: ec2.SubnetType.PRIVATE
            },
            memorySize: 256,
            timeout: Duration.minutes(1),
            securityGroups: [lambdaSecurityGroup]
        }
If you want to see how this differs between a Java lambda deployment, you can compare this file between my Java and GraalVM branches. One major improvement is the dramatic reduction in memory required – while the Java lambda doesn’t necessarily need 3GB to work, it needs it to bring the cold boot time to ~20 seconds which is still way off ideal.
Some of you may look at the above and think “what’s duff.Class?”. I’m not sure if it’s an oversight or potential mis-configuration on my part, but if you use the org.springframework.cloud.function.adapter.aws.FunctionInvoker then the spring-cloud-function CustomEventRuntimeLoop doesn’t kick in. There’s a specific check for the use of this handler, which looks like it assumes it’s running in a standard Java runtime on AWS Lambda if it’s being used.
Changing the handler to anything other than this (doesn’t even have to be a real class) will trigger the CustomEventRuntimeLoop which effectively serves as the entrypoint in the custom runtime, as opposed to the `FunctionInvoker` which is used in the Java runtime.
Deploying the Lambdas
Last thing to do is deploy the Lambdas and supporting resources (VPC, RDS MySQL Instance etc.). If you’re following along with my GitHub repo you can execute the following and go from nothing to a full working setup in ~30 minutes:
cdk deploy --require-approval=never --allAnd from there, you’ll have a Load Balancer deployed routing traffic to the newly created GraalVM Lambdas, with impressively fast (for Java) cold start times:
Conclusion
And there you have it, a real world example of taking a “full fat” Spring Boot application, and converting it into a responsive Lambda using GraalVM. There’s more you do to optimise both Spring Boot and GraalVM to improve the cold boot time further, but with minimal configuration this still results in impressive start times.
This was not an easy journey, and it took me quite a while encountering various rabbit holes. To help those of you who wish to try this out on your own applications, I’ve collated a list of issues I hit along the way below.
Common Problems
Build-time issues
Not enough memory
GraalVM for me at its peak used 10GB of memory to build the native binary. As I was running the build in a Docker container, my Docker VM on my Mac was running with a measly 2GB. Frustratingly all you have to go on is this cryptic error code 137:
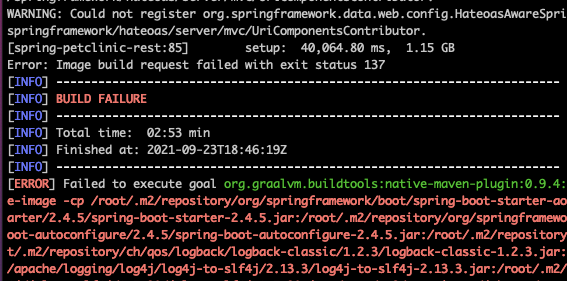
Thankfully, this is a documented issue, and upping my Docker VM memory to 12GB did the trick.
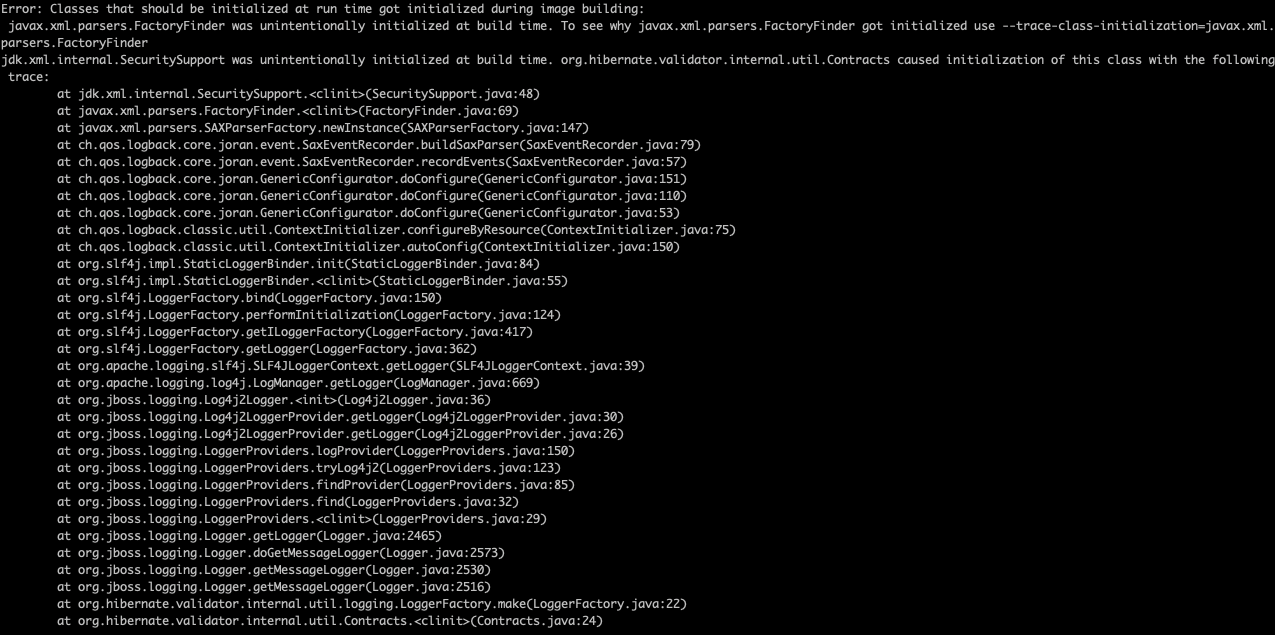
Classes unintentionally initialised at build time
Error: Classes that should be initialized at run time got initialized during image building:
 jdk.xml.internal.SecuritySupport was unintentionally initialized at build time. To see why jdk.xml.internal.SecuritySupport got initialized use --trace-class-initialization=jdk.xml.internal.SecuritySupport
javax.xml.parsers.FactoryFinder was unintentionally initialized at build time. To see why javax.xml.parsers.FactoryFinder got initialized use --trace-class-initialization=javax.xml.parsers.FactoryFinder
Spring Native by default sets classes to be initialised at run time, unless explicitly declared at build time in configuration. A lot of the benefit GraalVM brings is optimising load times by initialising suitable classes at build time, as opposed to run time. Spring does a lot of this OOTB, identifying classes that can be initialised at build time and setting this configuration for the native-image to use.
spring-boot-aot-plugin does a lot of introspection and identifies what classes are candidates for build time initialisation, and then generates the “native-image” property files used by the GraalVM compiler to understand which classes to initialise at build time. If you get the “Classes that should be initialized at run time got initialized during image building” error then it’s likely because a class that was flagged to initialise at build time inadvertently initialised another class, that wasn’t explicitly flagged to be initialised at build time.
If this happens, you can use the --trace-class-initialization flag in the pom configuration for the native-maven-plugin, and rerun the build:
<configuration>
                            <buildArgs>
                                --trace-class-initialization=jdk.xml.internal.SecuritySupport
                            </buildArgs>
                        </configuration>
                    </plugin>
This will then output the call stack that caused the class to be initialised.
You can also mark the additional classes to be initialised at build time, by creating a native-image.properties file under resources/META-INF/native-image with a comma-separated list of classes you’d like to initialise:
Args = --initialize-at-build-time=jdk.xml.internal.SecuritySupportUnfortunately in this case, it becomes a bit of a rabbit hole once you start uncovering more and more classes that need initialising at build time. Eventually you come across one that tries to spawn a thread which can’t happen at build time.
Anything initiated at build time that relies on a run time being active won’t fair so well. GraalVM has some checks built in that detects various situations and fails fast. One example of this is Threads – if a class initialisation spawns off a thread for whatever reason, GraalVM picks up on these and notifies you:
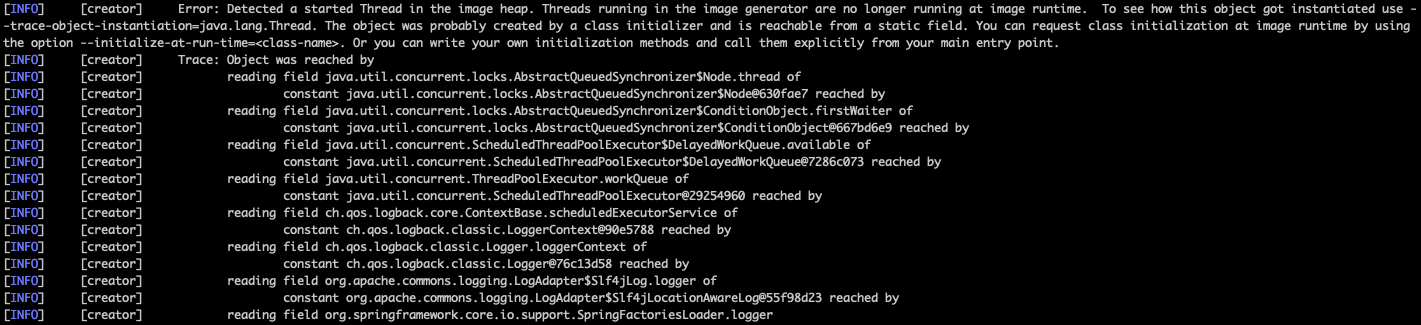
In this specific case, thankfully by reading the spring-native docs and finding this open GitHub issue I quickly realised this was linked to the use of logback.xml based configuration. Removing this file (which will require moving to another means of configuring logback) resolved this issue.
At this point we have a working binary built, awesome! Unfortunately it seems that a lot of the issues tend to creep up at runtime…
Runtime issues
This is where the feedback loop becomes ever so longer, because you have to build the image before the issue arises.
My testing loop during this experiment involved building a new binary and then uploading to AWS, repeating as I worked through my way through issues. Ideally we’d be testing this locally to significantly speed up the feedback loop. I suspect this is easily doable but didn’t have time to explore further, I may write a follow up to show how this can be done.
MalformedURLException when starting up
Caused by: java.net.MalformedURLException: Accessing an URL protocol that was not enabled. The URL protocol http is supported but not enabled by default. It must be enabled by adding the --enable-url-protocols=http option to the native-image command.
How to get around this? Enable http support in the native-image builder:
                    <plugin>
                        <groupId>org.graalvm.buildtools</groupId>
                        <artifactId>native-maven-plugin</artifactId>
                        <version>0.9.4</version>
                        ...
                        <configuration>
                            <buildArgs>
                                --enable-url-protocols=http
                            </buildArgs>
                        </configuration>
                    </plugin>
Missing reflection configuration
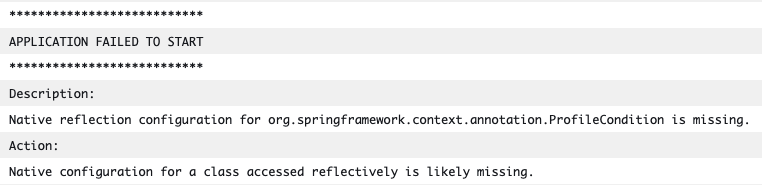
Whenever this message appears, it’s because this class is referenced via the Reflection API, and you need to add reflection config for the mentioned class.
You can do that in code using the Spring AOT @NativeHint annotation on the top of a configuration class (such as your base @SpringBootApplication class) or you can create a reflect-config.json file that the native-image tooling reads.
Sometimes this is a little less obvious – Spring tries to give advice where it can, but it can only advise on what it knows about. There’s a number of errors that are thrown up that don’t clearly suggest what the problem is.
There were a few variations of this error that I came across, but the solution was always the same – add reflect configuration in META-INF/native-image/reflect-config.json:
[
  {
    "name": "org.springframework.context.annotation.ProfileCondition",
    "allDeclaredConstructors": true,
    "allPublicConstructors": true,
    "allDeclaredMethods": true,
    "allPublicMethods": true,
    "allDeclaredClasses": true,
    "allPublicClasses": true
  }
  ...
]
The above is a rather crude reflection configuration – you can be much more specific in what you want to enable for reflection. Doing the above however gets results pretty quick.
Below are all the errors I encountered during the port to GraalVM, all which require adding the config above for the affected classes. These are also in order in which they occurred as well:
Caused by: org.springframework.beans.BeanInstantiationException: Failed to instantiate [com.zaxxer.hikari.HikariDataSource]: Factory method 'dataSource' threw exception; nested exception is java.lang.IllegalStateException: Cannot load driver class: com.mysql.jdbc.Driver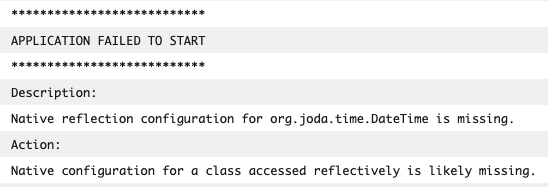
Caused by: java.io.UncheckedIOException: com.amazonaws.lambda.thirdparty.com.fasterxml.jackson.databind.exc.InvalidDefinitionException: Cannot construct instance of com.amazonaws.services.lambda.runtime.events.APIGatewayProxyRequestEvent (no Creators, like default construct, exist): cannot deserialize from Object value (no delegate- or property-based Creator)
Caused by: java.lang.ClassCastException: com.amazonaws.services.lambda.runtime.events.APIGatewayProxyResponseEvent cannot be cast to byte[]
at org.springframework.cloud.function.adapter.aws.AWSLambdaUtils.generateOutput(AWSLambdaUtils.java:173) ~[na:na]
This one threw me for a while 👆 because it looked unrelated. I can’t recall if I got to the bottom of this but I believe it’s related to the use of generics, the missing reflection info for APIGatewayProxyResponseEvent and type erasure, resulting in the event not being converted to byte[] by Jackson earlier on in the process when it should. Adding the reflection info for APIGatewayProxyResponseEvent fixed the problem.
Unsupported character encoding
https://github.com/oracle/graal/issues/1370
Caused by: org.springframework.jdbc.CannotGetJdbcConnectionException: Failed to obtain JDBC Connection; nested exception is java.sql.SQLException: Unsupported character encoding 'CP1252'Turns out when building a native image, only a subset of character encodings are embedded within the binary. If you want them all you have to ask for them:
<plugin>
                        <groupId>org.graalvm.buildtools</groupId>
                        <artifactId>native-maven-plugin</artifactId>
                        <version>0.9.4</version>
                        ...
                        <configuration>
                            <buildArgs>
                                --enable-url-protocols=http
                                -H:+AddAllCharsets
                            </buildArgs>
                        </configuration>
                    </plugin>