Update – 06/12/2022:
I’ve included a section at the top to track “Daily Habits”. I find this useful to keep on top of those daily tasks that aim to improve my skills. I use Todoist for this list as well (with recurring tasks), but managed using a separate project and an “Overdue” filter to only show the ones not completed for that day.

Intro
I wanted a high-tech alternative to the age old post-it note to do list, but I wanted something that’s energy efficient, clear and easy on the eyes. I also wanted something that was standalone from my monitors as I forget to check my todo list when it gets lost in the spiders web of windows and tabs I have open. I now have something I can quickly update using my phone, laptop or watch, which also gives me a motivational poster to start each day with:


Interested in building your own E-Ink planner? Use the steps in this guide and browse my GitHub repo to get you started:
https://github.com/foyst/eink-planner
I had an idea of using a Kindle (others of course are available 😄) eReader, and using the experimental browser feature of that I could write a simple website that periodically refreshed and displayed data on the E-Ink screen. However this was short-lived as the browser on the Kindle was incredibly basic and didn’t support most of the layout and formatting I was trying to do. I’ve seen examples of this working pretty well (see this awesome demo from 2015 on turning a Kindle into a bike odometer) so I’m guessing this was mainly due to how old my Kindle was, but nonetheless it was enough to put me off.
I was keen to continue down the E-Ink route though, and eventually I found a couple of YouTube videos that covered exactly what I wanted to do:
The person who presented the following video was kind enough to post his codebase online, which I ended up using as the starting point for my implementation:
This article also gives a great overview of how to render text and images on a smaller screen too:
https://medium.com/swlh/create-an-e-paper-display-for-your-raspberry-pi-with-python-2b0de7c8820c
Given how long Kindles and E-Ink technology has been around, I was hoping that DIY screens would be widely available and relatively cheap but unfortunately I think it’s a bit of a niche area. There wasn’t many suppliers I could find that sell these (WaveShare was one of a few) and the 7.5″ screen I used in this project set me back £70. When you add a Pi too you’re looking at close to £100 for this project, but I really liked the idea of experimenting with E-Ink so I went for it.
What you need
An E-Ink screen
This is the E-Ink screen I used, similar to that used in the 2nd video above:
https://www.amazon.co.uk/Waveshare-HAT-Resolution-Electronic-Controller/dp/B075R4QY3L?th=1
I decided against the tri-colour display in favour of the faster refresh times of the black and white equivalent. You can use the tri-colour display if you fancy – you’ll just need to extend my repo to colour the elements you’d like in red instead.
A Raspberry Pi
I used a Raspberry Pi 3 Model B for this, but you can use any variant you like really so long as you have access to some GPIO pins on it.
The screen I used is a Hardware Attached on Top (HAT) module, which means it can sit directly on the GPIO pins of your Pi if nothing else is already connected. But you can always individually connect the pins using an additional cable (provided with the screen) if you’d rather do it that way.
Getting Started
There’s plenty of articles online on how to implement the various pieces so I’ll not go too deep into the details, what I’ll cover is how I stitched them together and specific issues I encountered along the way.
The first issue I encountered was with the E-Ink screen. The first one of these I purchased ended up being faulty and I spent countless hours trying to figure out what I was doing wrong, unsure if I’d wired it up incorrectly or there was a bug in my code. My advice is if you’re the littlest bit unsure then make use of Amazon’s returns policy and get another one shipped out – at least that way you can quickly rule out if you just received a dodgy screen.
If you see the E-Ink screen hanging on “e-paper Busy”, you can try this hack which may get you a little further. But in my experience you shouldn’t need to do this and just highlights your screen is faulty.
WaveShare have some good documentation and code examples for every variant of E-Ink screen they provide, which you can find here:
https://www.waveshare.com/wiki/7.5inch_e-Paper_HAT
https://github.com/waveshare/e-Paper
https://medium.com/swlh/create-an-e-paper-display-for-your-raspberry-pi-with-python-2b0de7c8820c
If you’re an electronics newbie like myself and need to overcome that learning curve too, I found this to be a useful overview of the Raspberry Pi GPIO setup:
Setting up a Development Environment
It’s been a while since I’ve done any Python development and things have moved on from my days in PyCharm, and this time round I wanted to try it in VSCode. Here’s some guides I found useful to getting VSCode and a Python Virtual Environment setup:
https://code.visualstudio.com/docs/python/environments
https://techinscribed.com/python-virtual-environment-in-vscode/
For quickly iterating with development there’s two approaches that worked well for me
- Coding on the Pi using SSH integration – using the
Remote-SSHplugin you can connect directly to your Pi, view and edit files directly within VSCode. This way you can quickly make code changes, and then you can either run or debug the code remotely and see the changes directly on the screen. - Using the Pillow Python library you can write the image output to a file, instead of passing it to the EPD library to render on the screen. After playing with the SSH integration and seeing my changes come to life on the E-Ink screen, I moved to local dev and rendering changes to a file instead which is much quicker and saves the screen from being constantly refreshed.
Coding the Dashboard
Third Party Integrations
Todoist
Todoist is pretty straightforward to interact with using Python, and just by specifying an API key I was able to quickly code something up that would query my task list in Todoist.
api = TodoistAPI(TODOIST_TOKEN)
new_todo_response = api.get_tasks()
new_todo_response.sort(key=lambda x: x.order)
The last line orders the list of tasks returned by Todoist based on its order property (the order in which they’re visually displayed in your Todoist project). I currently just use Todoist as a single project, so if you use it for more things you’ll need to pass additional criteria to your get_tasks request.
There’s some good documentation for the Todoist API here:
https://developer.todoist.com/rest/v1/?python#overview
Google Calendar
This integration is more challenging as you need to create an OAuth Client, and then go through the OAuth authentication flow to access your calendar. This is how you do it…
Firstly you need an OAuth Client app and a set of OAuth Client credentials, which is what the planner script will use to interact with the Google Calendar API. To create these you’ll need a Google Cloud Platform account (which in itself is free to do, and so is creating an OAuth Client for this project).
Once you’re in the Google Cloud Console, go to “APIs & Services” in the menu on the left and select “Credentials”
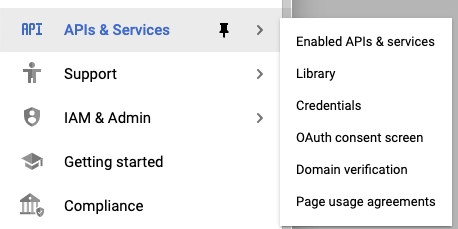
Click “Create Credentials” at the top of the screen and follow the instructions to create an OAuth client. For application type I chose “Desktop App” – “TVs and Limited Input Devices” may have been more appropriate but it didn’t cause any issues.
Next up once your Client Credentials are created, select the “OAuth Consent Screen” option on the left to configure the OAuth flow you’ll see and the scopes that the service will request.
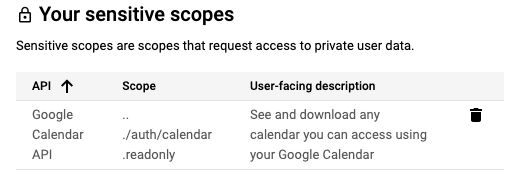
In the “test users” section, add your email address which contains the Calendar you want to show on the E-Ink display. If you keep this app as a private app in testing (which is what I’m doing) then you’ll need to specify your email as a test user, as Google will only allow accounts you’ve specifically whitelisted access to the app.
Once you’ve created a Client and given it the readonly calendar scope, you can take your client id and secret and integrate the planner script with Google Calendar. I borrowed this example for the skeleton of my code
https://dev.to/nelsoncode/google-calendar-api-con-python-1ib1
https://blog.logrocket.com/how-to-authenticate-access-google-apis-using-oauth-2-0/
There’s also the Google Python API quickstart which is helpful too:
https://developers.google.com/calendar/api/quickstart/python
This is what the calendar integration looks like:
try:
        if not creds or not creds.valid:
            if creds and creds.expired and creds.refresh_token:
                creds.refresh(Request())
            else:
                flow = InstalledAppFlow.from_client_secrets_file(
                    'client_secret.json', SCOPES)
                creds = flow.run_local_server(port=0, open_browser=False)
            # Save the credentials for the next run
            with open('token.json', 'w') as token:
                token.write(creds.to_json())

        service = build("calendar", "v3", credentials=creds)

        now = datetime.datetime.utcnow().isoformat() + 'Z'
        today_end = datetime.datetime.combine(datetime.datetime.utcnow().date() + datetime.timedelta(1), datetime.datetime.min.time()).isoformat() + 'Z'

        events = list(map(lambda event: { "summary": event['summary'], "start": event['start'] },
            service.events().list(calendarId='primary', timeMin=now, timeMax=today_end,
                                            maxResults=10, singleEvents=True,
                                            orderBy='startTime', maxAttendees=1).execute().get('items', [])))
    except BaseException as err:
        return ({}, err)

    return (events, '')
The challenge (highlighting my need to revisit all things OAuth) is that the script will operate in an unattended manner. When the planner service runs there’s no way for you to interact with the Pi or the E-Ink screen to navigate through the OAuth flow of logging in to your Google Account and granting your Client App access to your Calendar. If you are able to connect to a GUI session on your Pi either by hooking it up to a monitor or using VNC then you’d be able to open up a browser, and use the auth link in the script output to login. But this isn’t possible if your Pi is headless. The hacky way I got around this was to complete the auth flow on my development machine and then copied the token.json file onto the Pi.
Definitely an area for improvement. This SO question offers some suggestions on how to approach this by either doing the above or using a Google service account with which you share your calendar with.
Drawing elements on the screen
The codebase I forked uses the Python Pillow (PIL) library for drawing on the screen, so I continued to use it for my project. It’s a powerful image manipulation library that can do all sorts, and in this project we use it for drawing shapes and adding text to a canvas. It uses coordinates to place and draw elements on a picture, which the E-Ink library then renders on the screen.
Using logic you can create tasks and calendar lists by dynamically drawing elements on the image, and Pillow allows you to query the width and height of text so you know how big it’s going to be before rendering it. This is particularly useful when centre-aligning text on the screen (taken from this Stack-Overflow answer):
w, h = draw_black.textsize(quote_text_line, font=font_quote_text)
draw_black.text(((EPD_WIDTH-w)/2, line_location), quote_text_line, font = font_quote_text, fill = 0)
Adding quotes
At the bottom of my planner I wanted useful and inspiring quotes to cycle every time the screen refreshes.
I wanted a font which had nice looking open and close speech marks to wrap my quotes in. I found this article and the “IM Fell DW Pica SC” font to do it, which is available from Google Fonts
https://www.russfussuk.com/blog/good-quotation-mark-fonts/
Provisioning the Pi
I used Ansible to automate the provisioning of the Pi. Given a fresh Raspbian install you can run the playbook contained within my Git Repo to fully install, configure and start both services and all required dependencies.
This guide shows you how to setup the Pi in a headless fashion, so you don’t need to hook it up to a keyboard, mouse or monitor:
https://www.tomshardware.com/uk/reviews/raspberry-pi-headless-setup-how-to,6028.html
I used the following docs to stitch my Ansible Playbook together
https://docs.ansible.com/ansible/latest/user_guide/playbooks_intro.html
https://docs.ansible.com/ansible/latest/collections/ansible/builtin/systemd_module.html
Using Systemd
I’d worked with systemd and services before but never configured them from scratch.
I needed a way to ensure the planner automatically ran when the Pi started up, but also at 5pm needed it to stop so my motivational poster service could leave me with an inspiring message at the end of each day.
After doing some digging and weighing up options I landed on creating 2 systemd services for the planner and poster, having the poster start based on a systemd timer and by declaring the planner service can’t run in conjunction with the poster service (which causes it to stop when the poster runs)
This is a good article on how to create timers in systemd:
https://www.linux.com/topic/desktop/setting-timer-systemd-linux/
https://github.com/foyst/eink-planner/blob/main/systemd/eink-planner.service
[Unit]
Description=Eink Planner
After=multi-user.target
Conflicts=eink-poster.service

[Service]
User=ben
WorkingDirectory=/home/ben/eink-planner
ExecStart=python3 eink_planner.py

[Install]
WantedBy=multi-user.target
Whilst debugging the interaction between my two services and the time, I found you can use systemctl list-timers --all to gauge if the timer is configured correctly and when it’ll next run.
Finally, I wanted a way for the Pi to gracefully shutdown after the poster had been written so it could be safely powered down when I turn the rest of my workstation off. Nothing too fancy here just a crontab entry does the trick for me…
  - name: Add cron task to shutdown Pi at 5:20pm daily
    become: yes
    ansible.builtin.cron:
      name: "daily shutdown"
      user: root
      minute: "20"
      hour: "17"
      job: "/usr/sbin/shutdown now >/tmp/shutdown_cron.out 2>&1"
Summary
And that’s it! With this screen and Todoist I can now quickly create new tasks using my Apple Watch and voice commands and see it appear in minutes, my calendar is always in view and I have a cycle of motivational quotes and posters too which I really like. It’s been a fun introduction to Raspberry Pi’s and a little bit of electronics which I’d like to learn more about, but a good start for now!
Next Steps
This is what I would do next with this project:
- Use a widget/component/plugin system to place elements on the screen. My current approach relies heavily on the Python Pillow (PIL) library, and requires specific co-ordinates to be used for all the elements on the screen. The end result is basically an image, so any approach to drawing elements on an image can be used pretty much. I think SVG may be a good idea for this, but if you have better ideas on how to organise and draw widgets on the screen please let me know!
- Add additional widgets to the dashboard. In particular I’d like to display the number of Slack messages I have, this way I could turn off the huge distraction that is Slack on my machine, and use the E-Ink dashboard to gauge how many unread messages I have without getting sucked back into the app with every notification I get.
- Use a Raspberry Pi Zero 2 W – The much smaller, power efficient sibling to the Raspberry Pi 3 that I ended up using. This way just like the photo frame solution I based my version off I could mount the Pi directly to the frame, keeping it tidy and compact. If I can ever get my hands on one… they’re in very limited supply!
- Use something called a PiWatcher – a Watch Dog device for Raspberry Pi that allows you to fully shutdown and power up the Pi on a timer. The Pi only queries and updates the screen every 5 mins, sitting idle for the vast majority of the time. Being able to completely shut it down between screen refreshes would significantly reduce the power required for this and also open it up to the possibility of being battery powered, potentially running for months off a single charge.