Follow along with my GitHub repo for this blog: https://github.com/foyst/gcp-terraform-quickstart/
TL;DR – Here’s the headline differences that might be useful for those adopting GCP from an AWS background:
- Difference #1 In AWS, projects or systems are separated using AWS Accounts, where as GCP has the built-in concept of “Projects”.
- Difference #2 – The GCP Console is always at global level – no need to switch between regions.
- Difference #3 –
auto_create_subnetworks= false, otherwise you have a subnet created for every availability zone by default. - Difference #4 – You have to enable services before you can use them.
- Difference #5 – Firewall rules apply globally to the VPC, not specific resources.
- Difference #6 – You don’t define a subnet as public.
- Difference #7 – An Internet Gateway exists by default, but you have to explicitly create a NAT gateway and router.
- Difference #8 – To define a Load Balancer in GCP there’s a number of concepts that fit together: Front-end config, Backend Services, Instance Groups, Health Checks and Firewall config.
- Difference #9 – Load Balancer resources can be regional or global interchangeably.
As someone who has spent a few years working with AWS I’ve decided to dip my toe into GCP, and I thought it’d be useful to chronicle my experiences getting started with it so others may benefit.
I prefer to learn by doing, so I set myself the task of creating a simple reference architecture for load balancing web applications. The diagram below outlines this architecture:
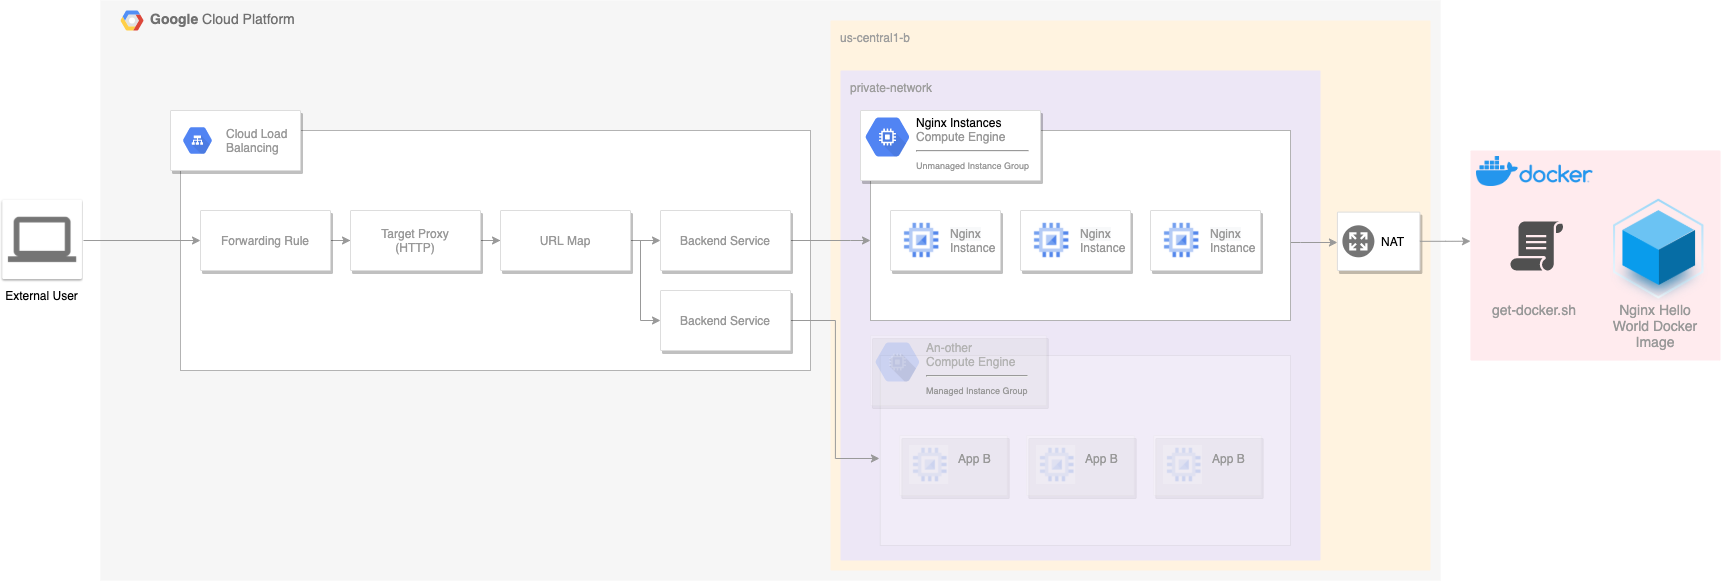
The goal is to deploy a load balancer than can route traffic to a number of instances running an nginx server. The nginx server itself is the nginxdemos/hello Docker image, which displays a simple webpage with a few details about the instance:
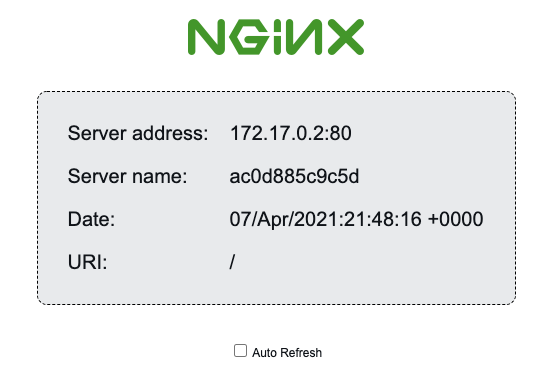
We’ll use the status page above to demonstrate load balancing, as the server address and name change when the load balancer round-robins our requests.
Creating a Google Cloud Account
Creating an account is relatively straight forward (if you already have a Google Account – if not you’ll need to set one up). Head over to https://cloud.google.com/ and click on the ![]() button in the top right of the page.
button in the top right of the page.
Once you’ve got setup with a Google Cloud Account, you’ll be presented with a screen similar to this:
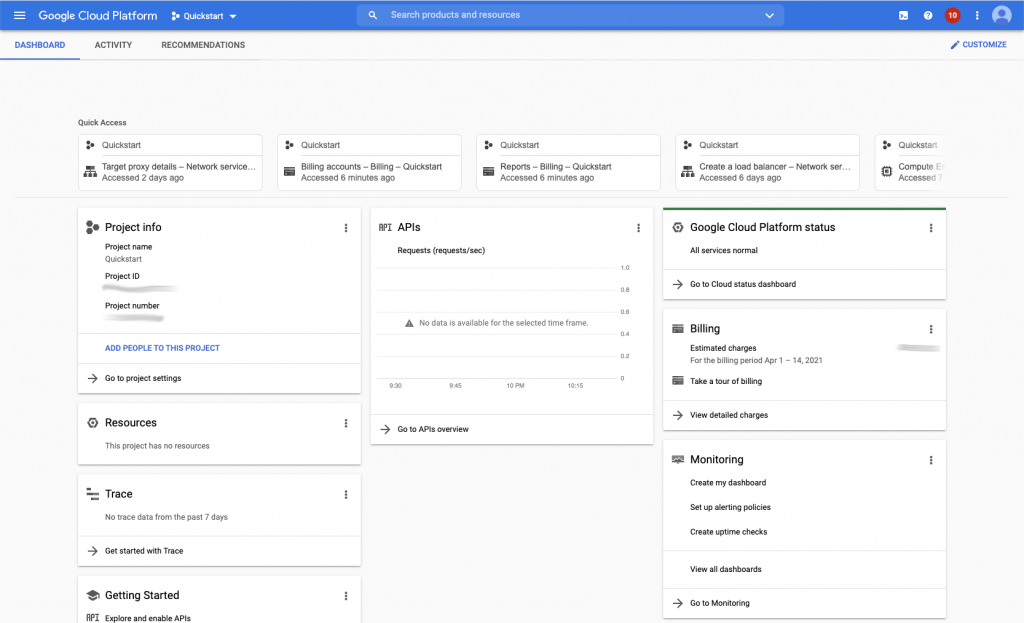
From here, you can start creating resources.
Creating a Project
Difference #1 In AWS, projects or systems are separated using AWS Accounts, where as GCP has the built-in concept of “Projects”. This allows you to stay logged in as a user and easily switch between projects. Having this logical grouping also makes it easy to terminate everything running under it when you’re done by simply deleting the project.
To create a new project, simply navigate to the main burger menu on the left-hand side, select “IAM & Admin” and then create a new project either through the “Manage Resources” or “Create a Project” options. Your Project consists of a name, an internal identifier (which can be overridden from what’s generated but can’t be changed later) and a location. Create a project with a meaningful name (I went with “Quickstart”) and choose “No Organisation” as the location.
Difference #2 – The GCP Console is always at global level – no need to switch between regions.
Setting up Billing
In order to create any resources in GCP you need to setup a Billing Account, which is as simple as providing the usual debit/credit card details such as your name, address, and card numbers. You can do this by opening the burger menu and selecting “Billing”. You’ll also be prompted with this action anytime you try to create a resource until Billing is configured..
Like AWS, GCP offers a free tier which you can use to follow this tutorial. During my experiments building a solution and then translating it into Terraform, it cost me a grand total of £1. However this was with me tearing down all resources between sessions which I’d strongly encourage you do too (and is simple enough if you’re following along with Terraform by running a terraform destroy.)
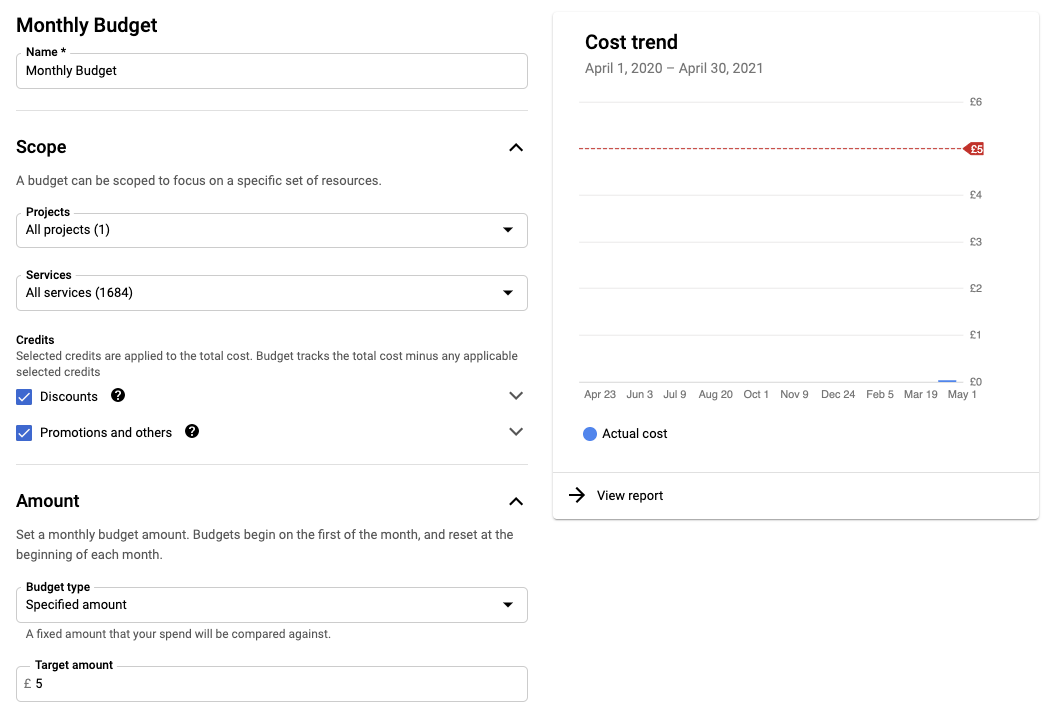
To avoid any horror stories at the end of the month, create a budget and set an alert on it to warn you when resources are bleeding you dry. Because I’m only spinning up a few resources (which will be short-lived) I’ve set my budget to £5.
To create a budget, open the burger menu and select “Billing”, then select “Budgets & alerts” from the left hand menu.
You can apply a budget to either a single project or across your whole estate, and you can also account for discounts and promotions too. With a budget you’re able to set the following:
- Scope – What projects and resources you’d like to track in your budget
- Amount – The spending cap you want to apply to your budget. This can be actual or forecasted (looks new, predicts if your budget is likely to be exceeded in the budget period given your resource utilisation to date)
- Actions – You can trigger email alerts for billing admins when your budget reaches certain thresholds (i.e. 50%, 70%, 100%). You can also publish events using a pub/sub topic to facilitate automated responses to notifications too.
Setting up GCloud CLI
https://cloud.google.com/sdk/docs/quickstart
Run the gcloud init command to configure the CLI to connect to your specific Google Account and Project. If you’re like me, you may have both business and personal accounts and projects on the same machine. If so you may need to run gcloud auth login first to switch between your accounts.
The GCloud CLI stores multiple accounts and projects as “configurations”, similar to AWS’ concept of “credentials” and “profiles”.
Setting up Terraform
I chose Terraform because it can be used with both AWS and GCP (and Azure for that matter) reducing the learning curve involved in adopting GCP.
For production use cases just like with AWS, you’re best off using a service role that adheres to security best practices (such as principle of least privilege and temporary privilege escalation) for executing automated deployments. But for getting started we’ll used the ‘gcloud auth’ approach.
We’ll be using the TF ‘local’ backend for storing state – when working in teams you can store state in cloud storage to manage concurrent changes where multiple users or tools may interact with a set of resources.
To get started, create a *.tf file in an empty directory (can be called anything, I went with main.tf) and add the following snippets to it:
variable "project_id" {
    type = string
}

locals {
  project_id = var.project_id
}

provider "google" {
  project = local.project_id
  region  = "us-central1"
  zone    = "us-central1-b"
}
The above sets up variables via the terminal (the project_id) and constants inline (the locals declaration), while the provider block configures Terraform with details about which cloud platform you’re using and details about the Project. In my sample code I went with us-central1 region – no reason behind this other than it’s the default.
At this point you’re ready to run terraform init. When you do this it validates and downloads the Google provider libraries needed to compile and interact with the GCP APIs. If you run terraform init before you add the above you’ll see a message warning you that you’ve initialised an empty directory, which means it won’t do anything.
From here, you can start adding resources to the file. Below I’ve linked to some getting started tutorials and useful references for working with the Google provider SDK which I found useful:
Useful links
https://learn.hashicorp.com/tutorials/terraform/install-cli?in=terraform/aws-get-started
https://registry.terraform.io/providers/hashicorp/google/latest/docs/guides/getting_started
https://www.terraform.io/docs/cli/init/index.html
https://registry.terraform.io/providers/hashicorp/google/latest/docs
https://stackoverflow.com/a/59056580 – automatically enable APIs (e.g. Compute Engine)
https://github.com/danielpoonwj/gcp-iac-demo
Creating a Network and VM
The first resource we’ll create is a google_compute_network, which is where our compute resources will be deployed.
resource "google_compute_network" "vpc_network" {
  name                    = "terraform-network"
  auto_create_subnetworks = false
  delete_default_routes_on_create = true
  depends_on = [
    google_project_service.compute_service
  ]
}

resource "google_compute_subnetwork" "private_network" {
  name          = "private-network"
  ip_cidr_range = "10.2.0.0/16"
  region        = "us-central1"
  network       = google_compute_network.vpc_network.self_link
}

resource "google_compute_route" "private_network_internet_route" {
  name             = "private-network-internet"
  dest_range       = "0.0.0.0/0"
  network          = google_compute_network.vpc_network.self_link
  next_hop_gateway = "default-internet-gateway"
  priority    = 100
}
There’s a few points worth mentioning about the config above:
- Difference #3 –
auto_create_subnetworks= false – In the GCP Console you don’t have separate consoles for each of the regions, resources from all regions are displayed on the same page. Important part here though – if you don’t explicitly override this flag then GCP will create a subnetwork for every AZ across all regions, which results in 20+ subnets being created. This was a little OTT for my needs and I also wanted to keep the deployment as similar to the AWS approach as possible, although this may be counter to GCP idioms (one for me to learn more about…) delete_default_routes_on_create = true– By default GCP will create a default route to0.0.0.0/0on your network, effectively providing internet routing for all VMs. This may not be preferable as you may want more control over how this is configured, so I disabled this.depends_on– Most of the time Terraform can identify the dependencies between resources, and initialise them in that order. Sometimes it needs a little guidance, and in this situation it was trying to create a network before the Compute Service (mentioned later…) was fully initialised. Adding this attribute prevents race conditions between resource creation.
(Later on I also had to apply the depends_on block to my google_compute_health_check, as TF also attempted to create this in parallel causing more race conditions.
Once you’ve got a network and subnetwork created, we can go ahead and configure a VM:
resource "google_compute_instance" "vm_instance" {
  name         = "nginx-instance"
  machine_type = "f1-micro"

  tags = ["nginx-instance"]

  boot_disk {
    initialize_params {
      image = "centos-7-v20210420"
    }
  }

  metadata_startup_script = <<EOT
curl -fsSL https://get.docker.com -o get-docker.sh &&
sudo sh get-docker.sh &&
sudo service docker start &&
docker run -p 8080:80 -d nginxdemos/hello
EOT

  network_interface {
    network = google_compute_network.vpc_network.self_link
    subnetwork = google_compute_subnetwork.private_network.self_link

    access_config {
      network_tier = "STANDARD"
    }
  }
}
Hopefully most of the above looks fairly similar to its AWS counterpart. The access_config.network_tier property is the main difference – Google has two different tiers (STANDARD and PREMIUM), of which the latter provides performance benefits by routing traffic through Google networks (instead of public internet) whenever it can at an additional cost.
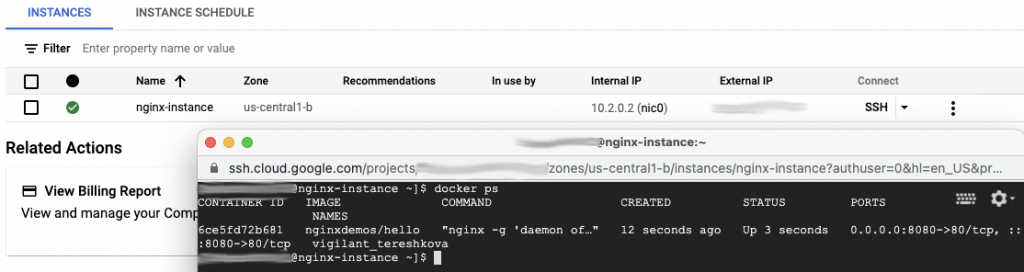
The metadata_startup_script key is a shortcut key TF provides to configure scripts to execute when a VM starts up (similar to the UserData key in AWS). In this case, I used it to install Docker and start a instance of the nginxdemos/hello Docker Image (albeit in a slightly crude manner).
Deploying the Resources
At this point, we’re able to run our first terraform apply.
Difference #4 – You have to enable services before you can use them.
When you run a terraform apply, you may find you get an error stating that the Compute Engine API has not been used in the project before or has been disabled. When you use a service for the first time in a project you have to enable it. This can be done by clicking the “Enable” button found in the service’s landing page in the GCP web console, or you can enable it in Terraform like so:
resource "google_project_service" "compute_service" {
  project = local.project_id
  service = "compute.googleapis.com"
}
Once Terraform has successfully applied your infrastructure, you’ll have a newly created VPC and VM running within it. The first thing you might want to try is SSH into it, however you’ll probably find that the connection hangs and you aren’t able to connect.
You can triage the issue by opening the Compute Engine -> VM instances, click the kebab icon (TIL this is called a kebab icon!) and select “view network details”. Under “Ingress Analysis” in “Network Analysis” you can see that there’s no firewall rules configured, and the default is to implicitly deny traffic:
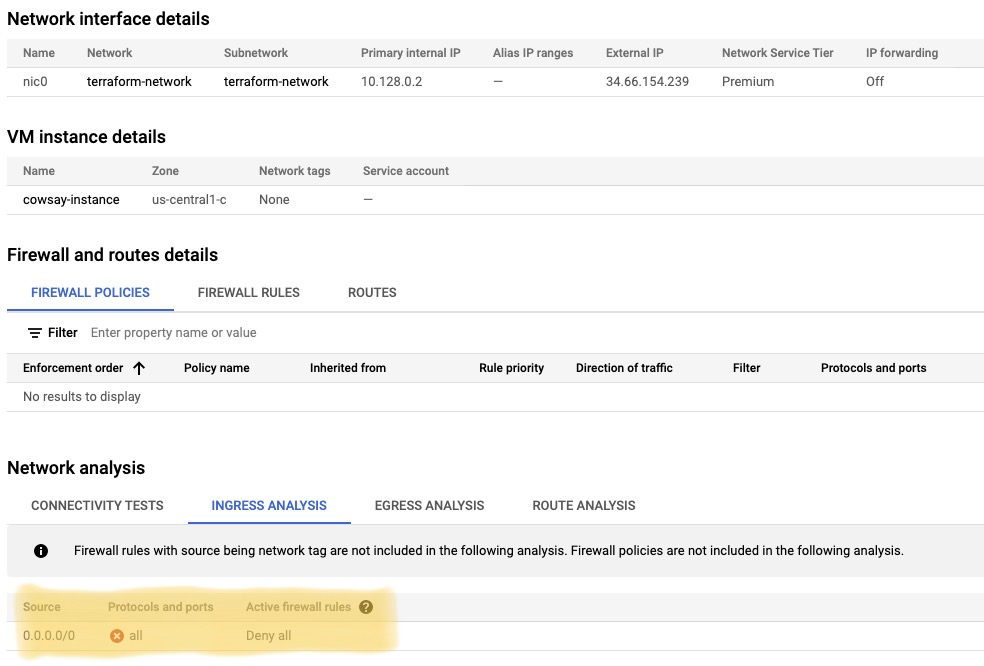
So next up, I’m going to create a firewall rule to allow inbound internet traffic into my instance. I created the following rule that allows connections from anywhere to target instances tagged with nginx-instance:
resource "google_compute_firewall" "public_ssh" {
  name    = "public-ssh"
  network = google_compute_network.vpc_network.self_link

  allow {
    protocol = "tcp"
    ports    = ["22"]
  }

  direction = "INGRESS"
  source_ranges = ["0.0.0.0/0"]
  target_tags = ["nginx-instance"]
}
Difference #5 – Firewall rules apply globally to the VPC, not specific resources.
In GCP, there isn’t an equivalent of a Security Group, which in AWS-world controls access to the resources it’s associated with. In GCP, firewall rules are associated to the network, and are applied on resources by making use of network tags.
Similar to AWS, you can tag your resources to help you manage and organise them with the use of labels. Separately though, the network tag mechanism is what’s used to apply firewall rules. In the code snippet above, you specify the rules you wish to apply, and also which network tags (or ranges if you’d prefer) to apply the rule to.
Difference #6 – You don’t define a subnet as public.
I’ll leave this article here, which for me nicely summarised the differences between AWS and GCP networking:
https://codeburst.io/vpc-networking-gcp-v-s-aws-77a80bc7cfe2
The key takeaways for me are:
- Networking in GCP is flat, compared to the hierarchical approach taken by AWS.
- Routing tables and firewall rules are associated directly with the VPC, not subnets or resources
- VPCs are global concepts (not regional) and traffic automatically flows across regions
- Subnets are regional concepts (not AZ-bound) and traffic automatically flows across AZs also
- “GCP: Instances are made public by specifically enabling them with an external IP address; the ‘Default route to the internet‘ automatically routes Internet-bound traffic to the Internet gateway or NAT gateway (if it exists) based on the existence of the external IP address”
For example, you don’t directly assign a firewall rule to instance(s), but use network tags to apply a firewall rule to them. Similarly for routes you don’t have routing tables that you assign to subnets – you simply define a VPC-level route, the next hop traffic should take, and optionally network tags to specify which resources to apply the route to.
Ok great, so public access is now permitted and we’ve got an instance that we can SSH to and see an Nginx container running. But going forwards I want to secure this instance behind a load balancer, with no public access.
So how do we make instances private in TF? Simply omit the access_config element from your google_compute_instance resource if you don’t want a public IP to be assigned.
There appears to be some confusion online on what the “Private Google Access” feature does, specifically its influence on whether an instance is private or public-facing. According to the docs, instances without a public IP can only communicate with other instances in the network. This toggle allows these private instances to communicate with Google APIs whilst remaining private. Some articles allege that it’s this toggle which makes your instance public or private, although from what I’ve read I think that’s inaccurate.
Now, when I made my instance private it introduced a new problem: It broke my Docker bootstrapping, because the instance no longer has a route to the internet. Time to introduce a NAT gateway…
Difference #7 – An Internet Gateway exists by default, but you have to explicitly create a NAT gateway and router.
Some areas of the GCP documentation state that traffic will automatically flow to either the default internet gateway or a NAT gateway based on the presence of an external IP address attached to an instance. This led me to believe that a NAT gateway was also provided by default, although this turned out not to be the case when I removed the external IPs from my Nginx instances. When I did this the instances were unable to connect out to download Docker or the Nginx Docker image.
I added the following to my Terraform which re-enabled outbound connectivity, whilst keeping the instances private:
resource "google_compute_router" "router" {
  name    = "quickstart-router"
  network = google_compute_network.vpc_network.self_link
}

resource "google_compute_router_nat" "nat" {
  name                               = "quickstart-router-nat"
  router                             = google_compute_router.router.name
  region                             = google_compute_router.router.region
  nat_ip_allocate_option             = "AUTO_ONLY"
  source_subnetwork_ip_ranges_to_nat = "ALL_SUBNETWORKS_ALL_IP_RANGES"
}
Creating a Load Balancer
Creating a Load Balancer is interesting. Google manages a lot of this at a global level and provides different “flavours” of load balancer applicable for different use cases:
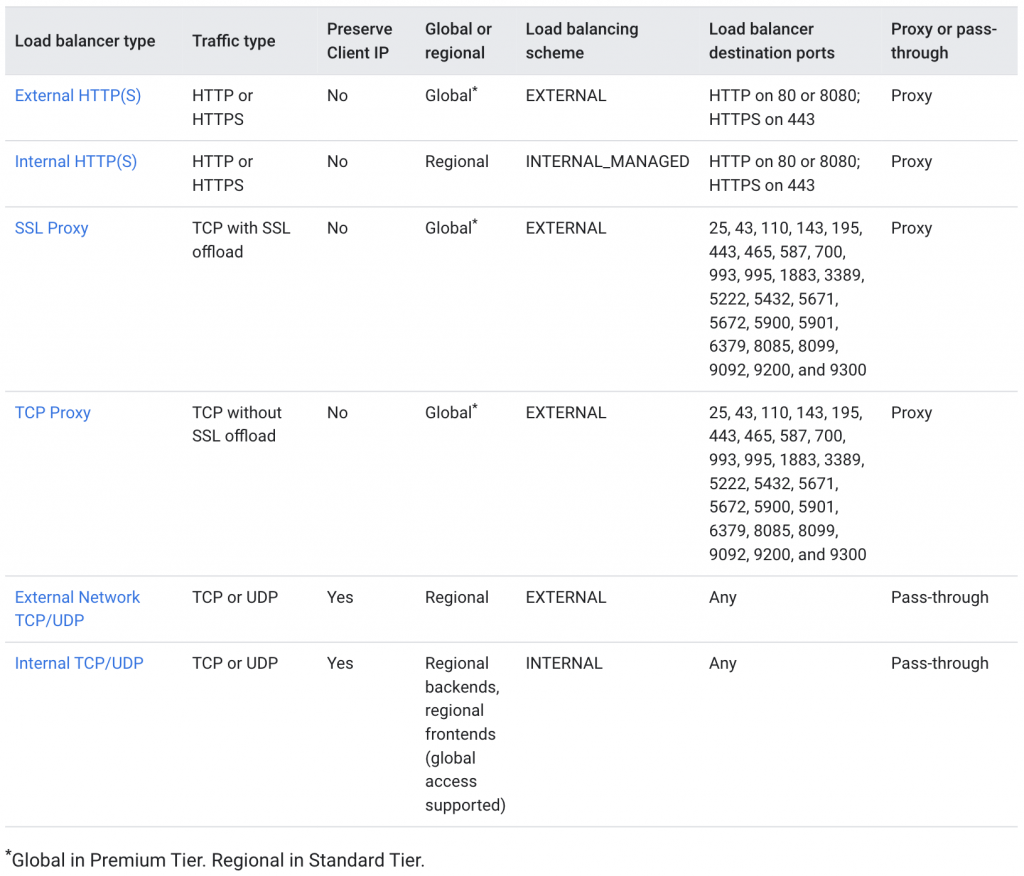
Difference #8 – To define a Load Balancer in GCP there’s a number of concepts that fit together: Front-end config, Backend Services (or Backend Buckets), Instance Groups, Health Checks and Firewall config.
For my HTTP-based service, the flow of incoming requests looks like:
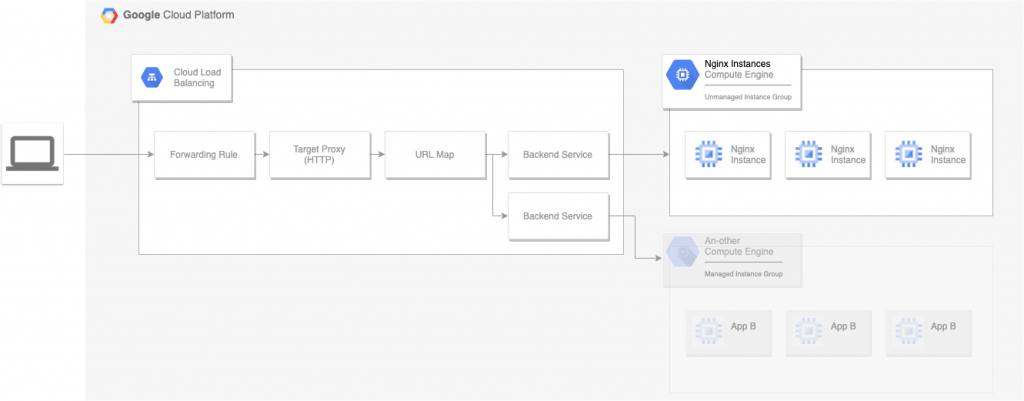
Load Balancers aren’t a tangible resource in TF, rather the result of configuring and connecting the previously mentioned resource types. The entry point for a Load Balancer appears to be the ‘Forwarding Rule’, specifically compute_forwarding_rule.
To create a Regional-level Load Balancer using the Standard networking tier, I used the following TF:
resource "google_compute_instance_group" "webservers" {
  name        = "terraform-webservers"
  description = "Terraform test instance group"

  instances = [
    google_compute_instance.vm_instance.self_link,
    google_compute_instance.vm_instance_2.self_link
  ]

  named_port {
    name = "http"
    port = "8080"
  }
}

# Global health check
resource "google_compute_health_check" "webservers-health-check" {
  name        = "webservers-health-check"
  description = "Health check via tcp"

  timeout_sec         = 5
  check_interval_sec  = 10
  healthy_threshold   = 3
  unhealthy_threshold = 2

  tcp_health_check {
    port_name          = "http"
  }

  depends_on = [
    google_project_service.compute_service
  ]
}

# Global backend service
resource "google_compute_backend_service" "webservers-backend-service" {

  name                            = "webservers-backend-service"
  timeout_sec                     = 30
  connection_draining_timeout_sec = 10
  load_balancing_scheme = "EXTERNAL"
  protocol = "HTTP"
  port_name = "http"
  health_checks = [google_compute_health_check.webservers-health-check.self_link]

  backend {
    group = google_compute_instance_group.webservers.self_link
    balancing_mode = "UTILIZATION"
  }
}

resource "google_compute_url_map" "default" {

  name            = "website-map"
  default_service = google_compute_backend_service.webservers-backend-service.self_link
}

# Global http proxy
resource "google_compute_target_http_proxy" "default" {

  name    = "website-proxy"
  url_map = google_compute_url_map.default.id
}

# Regional forwarding rule
resource "google_compute_forwarding_rule" "webservers-loadbalancer" {
  name                  = "website-forwarding-rule"
  ip_protocol           = "TCP"
  port_range            = 80
  load_balancing_scheme = "EXTERNAL"
  network_tier          = "STANDARD"
  target                = google_compute_target_http_proxy.default.id
}

resource "google_compute_firewall" "load_balancer_inbound" {
  name    = "nginx-load-balancer"
  network = google_compute_network.vpc_network.self_link

  allow {
    protocol = "tcp"
    ports    = ["8080"]
  }

  direction = "INGRESS"
  source_ranges = ["130.211.0.0/22", "35.191.0.0/16"]
  target_tags = ["nginx-instance"]
}
Difference #9 – Load Balancer resources can be regional or global interchangeably
Depending on the network tier and level of availability you’re architecting for, you can have regional or global Load Balancers – the latter deploys your Load Balancer across all regions and utilises Google networks as much as possible to improve throughput.
However, this confused me when deciding that I only wanted a regional Load Balancer utilising the Standard network tier. According to the GCP docs, Backend Services used by HTTP(S) Load Balancing are always global, but to use the Standard network tier you have to create a regional Forwarding Rule.
This confusion was made more challenging for me by the inconsistent use of global and regional discriminators in TF resource types, which made it a struggle to hook up the resources required to create a Load Balancer. The fact that you create a normal url map and http target proxy, but then attach that to a google_compute_global_forwarding_rule, confused me somewhat!
The name of the Load Balancer appears to come from the google_compute_url_map resource… I’m not quite sure why that is? Maybe because it’s the first LB-related resource that’s created in the chain?
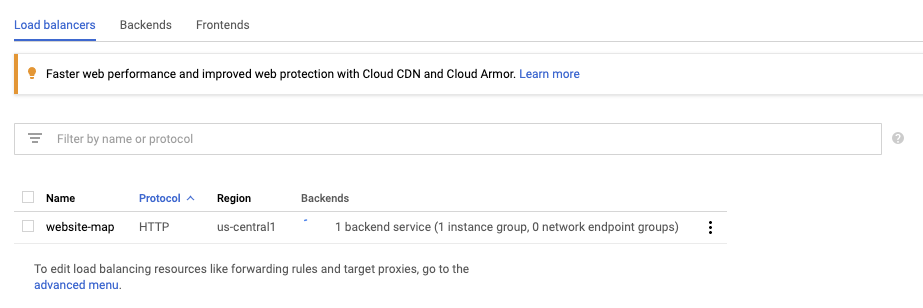
The GCP Console for Load Balancers can be confusing, because when you first open it after deploying the Terraform only a subset of the resources we define are visible:
However, by selecting the “advanced menu” link at the bottom of the page, you get an exploded view of the Load Balancer configuration:
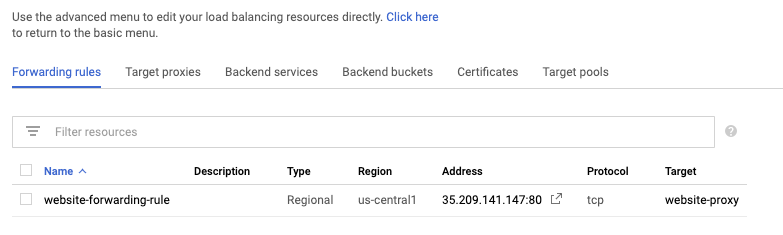
Even in the Advanced view however, you can’t view URL maps directly (referenced by target proxies). URL maps are what glue the HTTP Target Proxy and Backend Service(s) together, and it’s here where you specify any HTTP routing you’d like to apply (similar to AWS ALB Listener Rules, that map a Rule to a Target Group). You can view existing and attached URL maps by opening the target proxy they’re attached to and following the link that way.
An Instance Group is similar to an Auto Scaling Group in AWS, except you can also have Unmanaged Instance Groups which are a manually maintained group of potentially heterogeneous instances.
I used an Unmanaged Instance Group in this scenario, which combined with the Backend Service is similar to an unmanaged/manually maintained Target Group in AWS terms.
Although Health Checks are related to Instance Groups within the GCP console, they’re not directly linked. This means the service that uses the Instance Group (in our case our Load Balancer) can separately choose which Health Check is most appropriate for its use case.
External HTTP Load Balancers provided by GCP don’t run within your VPC – they’re provided as part of a managed service. Because of this and as per the Load Balancing documentation, you have to create a firewall rule that allows traffic from the following source IP ranges (managed Load Balancer) to your private VMs:
130.211.0.0/22
35.191.0.0/16
You can use the instance network tags we set up earlier to restrict where traffic from the load balancer is allowed to go to.
An awkward limitation of the Load Balancer advanced section of the web console I found was you can’t create all the configuration from here – you have to create a Load Balancer first using the basic wizard, and only then can you edit the advanced elements.
Scaling out
So at this point I have traffic flowing via a Load Balancer to my single instance which is pretty neat, but how can I demonstrate balancing traffic between two instances? Add another instance in TF and hook it up to our webservers instance group:
resource "google_compute_instance" "vm_instance_2" {
  name         = "nginx-instance-2"
  machine_type = "f1-micro"

  ...copy/paste of existing instance config
}

resource "google_compute_instance_group" "webservers" {
  name        = "terraform-webservers"
  description = "Terraform test instance group"

  instances = [
    google_compute_instance.vm_instance.self_link,
    google_compute_instance.vm_instance_2.self_link
  ]

  named_port {
    name = "http"
    port = "8080"
  }
}
And voila! We have a working example that can load balance requests between two instances… result!

Gotchas
Working with GCP and Terraform, there were a couple of gotchas that caught me out.
- Terraform defaults a lot of the resource parameters if you don’t specify them. Although I imagine a lot of these are sensible defaults (and I suspect TF takes a similar approach with AWS), if you’re not aware of what they’re defaulted to they very quickly conflict with those settings you do specify, and personally it took me a while to identify what parameters were conflicting with each other. GCP wasn’t overly helpful in providing guidance on triaging the conflicts that were reported back through Terraform.
- Also it appears that some parameters have different defaults between their regional and global resource counterparts, so beware when switching between the two you don’t unintentionally introduce unexpected config conflicts.
- The field names aren’t always consistent between the web console and TF so something to watch out for. For example in a backend service the console refers to “Named port”, however in TF it’s
port_name. - The last one is for me to work on (and find the right tooling), but a lack of compile-time checking (compared to something like CDK) which slowed me down. I had to deploy to find out if I was incorrectly mixing regional resources with global ones, which resulted in a longer feedback loop.
Final Thoughts
In conclusion, my first impressions of GCP is that it’s not too dissimilar to offerings provided by AWS once you understand the subtle differences in behaviour and terminology. The UI feels more responsive and looks slicker in my opinion, especially when you compare it to the current mixture of old and new UIs strewed across the AWS services.
Creating resources in GCP with TF was straightforward enough. The fact that VPCs are created at a global level and all resources are displayed at a global level allows you to view your whole estate from one view which I like. Just need to be mindful of regional vs global resources, specifically what permutations of these you can use and pros and cons of each.
How to improve this setup
- Replace the Unmanaged Instance Group with a managed one. This would be similar to using an Auto Scaling Group in AWS, which could elastically scale instances and create new ones in the event of instance failures. For the purposes of this I wanted to understand all of the pieces and how they fit together, but it wouldn’t be too difficult to convert what’s here to use a Managed Instance Group instead.
- In GCP you can use “Container-optimised” OS images that start a specified Docker image when the VM boots up. This would remove the need of the
metadata_startup_scriptscript, which would save a good few minutes on provisioning new VMs. However, I’d probably recommend something a bit more comprehensive for managing containerised applications, such as Google Kubernetes Engine (GKE) - If the containerisation route isn’t an option, you could consider ways to provision your VMs in a repeatable and idempotent way. For example. employing the likes of Ansible or Chef to do this provisioning at runtime, or build an OS image with something like Packer to speed up the deployment.
Learning next steps
Now I’ve gained a basic understanding of the GCP platform and how to deploy resources with Terraform, my next explorations will be into
- GKE – how to automate provisioning of Docker Containers using a combination of Terraform to provision GKE, and then using Kubernetes to run a fleet of containers. This would be similar to the use of either AWS ECS or EKS
- Serverless services – Now that I understand more about the lower-level networking concepts, I’ll look to explore and compare GCPs offerings to the likes of AWS Lambda, Step Function, SNS, SQS etc.